Originally published in blog.kool.dev
In just 3 simple steps, you can use Kool CLI’s kool create command to start a new Laravel application running in a local Docker environment. Kool is an open source dev tool that makes using Docker for local development a lot easier.
Before you start, if you haven’t done so already, you need to install Docker and Kool CLI.
1. Create a new Laravel application
Requirements: if you haven’t done so already, you first need to install Docker and Kool CLI.
$ kool create laravel my-project
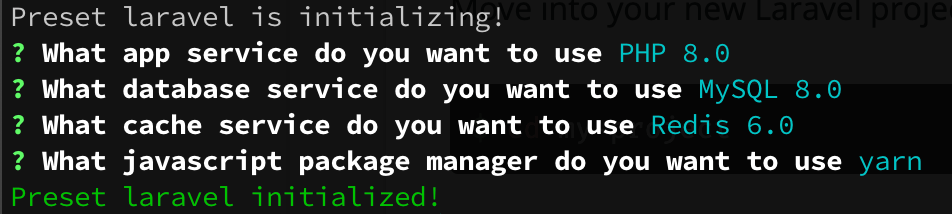
This command may take a minute or two to complete while Composer downloads Laravel’s vendor dependencies. After installing Laravel, kool create automatically runs the kool preset laravel command, which helps you set up your project’s development environment using an interactive wizard.
PHP
? What app service do you want to use  [Use arrows to move, type to filter]
> PHP 8.0
  PHP 7.4
Database
? What database service do you want to use  [Use arrows to move, type to filter]
> MySQL 8.0
  MySQL 5.7
  MariaDB 10.5
  PostgreSQL 13.0
  none
Cache
? What cache service do you want to use  [Use arrows to move, type to filter]
> Redis 6.0
  Memcached 1.6
  none
Package Manager
? What cache service do you want to use  [Use arrows to move, type to filter]
> Redis 6.0
  Memcached 1.6
  none
After selecting your preferences, the latest version of Laravel will be installed and ready for you in your my-project folder, along with your new kool environment.
Move into your new Laravel project:
$ cd my-project
The kool preset command auto-generated the following configuration files and added them to your project, which you can modify and extend.
+docker-compose.yml
+kool.yml
2. Update .env.example
Next, we need to make a few tweaks to the default .env.example file that ships with Laravel in order to match the services in your docker-compose.yml file. For example, we need to change the hosts from localhost to the appropriate service container name, which are accessible from within Docker.
Database Services
MySQL 5.7 and 8.0 / MariaDB 10.5
-DB_HOST=127.0.0.1
+DB_HOST=database
PostgreSQL 13.0
-DB_CONNECTION=mysql
+DB_CONNECTION=pgsql

-DB_HOST=127.0.0.1
+DB_HOST=database

-DB_PORT=3306
+DB_PORT=5432
Cache Services
Redis
-REDIS_HOST=127.0.0.1
+REDIS_HOST=cache
Memcached
-MEMCACHED_HOST=127.0.0.1
+MEMCACHED_HOST=cache
3. Run kool run setup
Now, spin up your local environment for the first time using the setup script in your kool.yml file:
$ kool run setup
Note: if you’re running this command for the first time, Docker may need to download all the container images that are being used, which can take a few minutes, depending on your internet connection.
That’s it!
After kool run setup has finished, you can access your new Laravel app at http://localhost.
$ kool run setup

Creating network "my-project_kool_local" with the default driver
Creating volume "my-project_database" with default driver
Creating volume "my-project_cache" with default driver
Creating my-project_cache_1    ... done
Creating my-project_app_1      ... done
Creating my-project_database_1 ... done

Dive Deeper
- Read the docs for our Laravel Preset to learn more about using Kool with Laravel.
- Go to kool.dev to learn more about the Kool open source project.
Leave a Reply